Isometric Slicing
Amberspire Design Diary #12
This blog is a quick technical breakdown of how Amberspire buildings and sprites are sliced up and rendered in game. See the other design diaries, wishlist the game, or subscribe to our newsletter.
Alongside working on the art style of the game was figuring out how to render buildings so they would sort correctly and maintain performance with hundreds of buildings and layers on screen.
Constraints
The first step is establishing some constraints. The first and biggest was a building always had a square footprint on the grid. This simplified many things, and left height open for art to establish unique silhouettes. Without any patterns or convexity to worry about, the game could have buildings of varying size and ease my headaches on rendering.
Varying size is a key detail here, because while we wanted to evoke a classic city builder feel of sprites and a grid, having all buildings be one or two grid spaces wide would deflate a lot of potential in depicting a science fantasy city. Most other constraints followed with standardized sizes of grid spaces, doors and windows, and opacity (more on that below).
Slicing
For a feature that I was not able to implement and am going to keep secret in case I can figure it out, I wanted every building to have a kind of awareness of how much space it took up in the world. This necessitates slicing up the building image into various parts so they can be rendered at different depths. While the ultimate goal was never quite reached, it did ensure a very reliable method to sort buildings on the grid.
Typically in an isometric game, sprites are sorted by how close they are to the camera, which typically means how close they are to the bottom of the screen. This is only the starting point however, since buildings of different sizes might be positioned lower on the screen but will require to be behind other parts of buildings.
Further complicating matters is height. A tall building needs to reach over other buildings, even in edge cases like when it is off screen. But not all of the building is at the same height, so you’ll have to factor in which parts of the building are on the ground and which are high up.
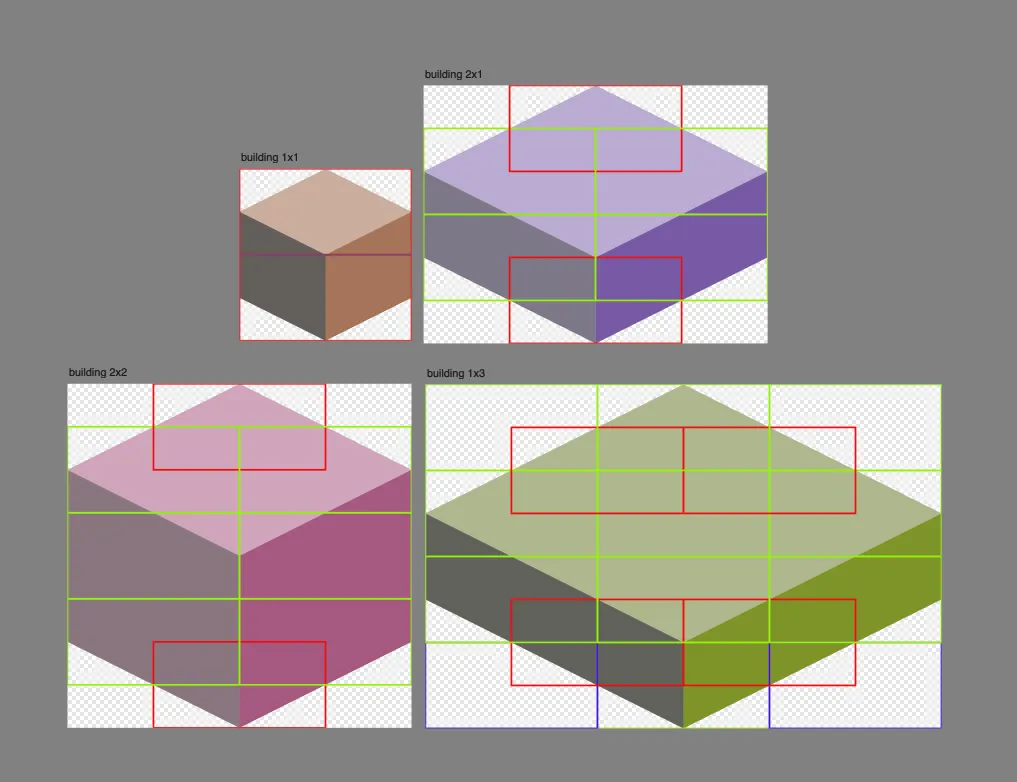
Each ground tile in the game is one slice, a sprite of width and length but no height. A building that is 1x1x1 (Residents and terrain tiles) has two slices – not quite the ‘ground’ exactly but the bottom and the top. A 2x2x1 building (the smallest of the kind the player can build) has five slices - a top and bottom, and four slices to cover the full width and breadth. These do overlap, but for technical reasons it will make sense. It does add a subtle constraint to the art: it can only display full on or off opacity, no transparency.
Rendering
On screen is a static field of grid spaces that never moves. A camera points at them, which also doesn’t move. Each space holds a position for a sprite, and when the view of the game moves, all the spaces update which sprite is being displayed, giving the illusion of movement.
Each building slice corresponds to one of these grid spaces. Our 1x1x1 building occupies its position and the space above it, and the 2x2x1 building spreads out on the grid occupying some of the left and right offset spaces.
Of course, each building has some height to it. A 1x1 building occupies the sprite behind it, but in that grid position could occupy another building, so the top sprite of the front building needs to be offset so the behind building can draw behind it.
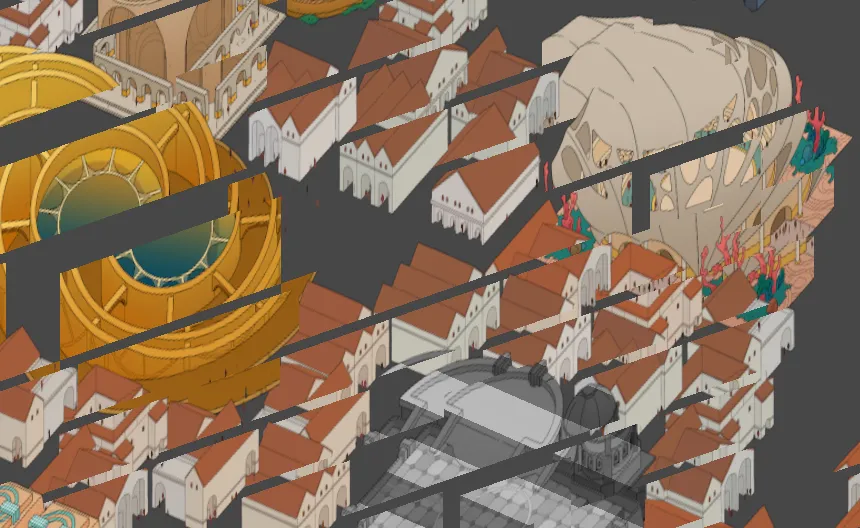
This gets more complex for 2x1 buildings, as you can see here:
    0.75f,
0.75f, 0.75f,
0.00f, 0.00f,
    0.00f,
the bottom three sprites do not get an offset since they are ‘on the ground’ and the top three sprites are ‘higher up’ and so get some height offset. Note here that height offset in a 2D isometric game corresponds to vertical position and forward offset together, like any other isometric game.
You can see the progression on a 2x2 building
    1.50f,
1.50f, 1.50f,
0.75f, 0.75f,
0.00f, 0.00f,
    0.00f,
as the building gets taller. At first I tried to figure out some algorithmic way to derive these values, for every width and step of height, each part would get some offset. This turned out to be a silly waste of time, since with my constraints there were only a few possible building shapes across the whole game. Given the various sizes of building there are only eight patterns in the game (not counting simple 1x0 and 1x1) so it was way easier to just define these offsets myself to make sure the sorting worked instead of finding some all purpose algorithm.
This became especially useful once I realized how weird things get for large and tall patterns like 4x2:
         1.50f,
1.75f, 1.50f, 1.50f, 1.75f,
1.50f, 1.50f, 1.50f, 1.50f,
0.75f, 0.75f, 0.75f, 0.75f,
0.00f, 0.75f, 0.75f, 0.00f,
-.25f, 0.00f, 0.00f, -.25f,
         0.00f,
I can’t now remember why those negative values are necessary, but they are!
A few remaining details are the ground and street layers, which use a mix of wave function collapse and 9-sliced tiling to draw correct shapes and patterns; and the moon structure tiles which are alternating patterns of left and right halves of the arches to give a sense of scale to the space beneath the city.
Anyway, that’s how the Amberspire rendering works! A bit overkill but once I got it figured out it hasn’t given me any problems since.